
Homemade Pie Crust with Tips
*This post is tips and technics on how to make a homemade pie using a homemade crust recipe. These tips and technics will help with most pies that get bake in the crust.
The Crust Ingredients
I use a crust recipe that is made with very basic ingredients that you have on hand. I have been making it for many years, to be honest, decades. It is a recipe that has been handed down for many generations. My husband’s aunt, Henrietta, used it to bake pies for a local restaurant. Her pies became a favorite for many people that traveled through town. They would stop just to get a piece of her pie.
The bests way to remember the recipes is to half the ingredient measurements:
- 2 cups flour
- 1 cup lard or shortening
- 1/2 cup hot water
- 1/4 tsp salt
Homemade pies are a special occasion dessert at our home, so I use lard. It’s what my family prefers.
Mixing the Crust
I put salt in the water and microwave it for a little bit to get it hot, but not boiling. Put the flour and lard in a bowl and add the salt and water mixture in a larger bowl. There are various ways to mix it together.
A food processor is the fastest way to make the crust. Put everything in the food processor and turn it on. When it is mixed, it will ball up. Just check to make sure there are no lard clumps.
A pastry cutter works great for a by hand method. You just press pastry cutter through the dough and over the bottom of the mixing bowl. It cuts through the lard and blends it in with the other ingredients. It will take a bit to get it mixed well. Cleanup is a lot easier.
It can also be done with a sturdy fork by pressing the tines of the fork through the ingredients and against the side of the bowl.
Once everything is mixed well, divide the dough into two balls and refrigerate them for a couple of hours or overnight. Chilling the dough makes it less sticky and easier to roll out.
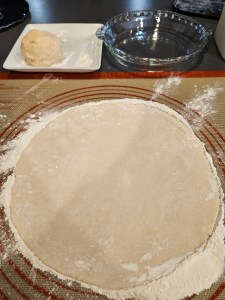
Rolling the Dough
Once the dough is chilled, generously flour your work surface, and keep it floured. I like to use a silicone mat to work on. It helps with the cleanup. Rub flour over the rolling pin, too. This needs to stay well floured too. Place the dough in the center of the floured area. Roll it in the flour and add more flour to work surface if needed. Press the dough down a bit, flip the dough over, and using the rolling pin begin rolling it out. Your dough should move slightly over the floured surface. If not, you will need to add more flour. Roll it until it is about 1/8-1/4 inch thick and about an inch larger than your pie plate. Don’t cut the dough just yet.
To roll the dough in a roundish shape move the rolling pin in the direction you want to be larger. The dough will widen in the direction you roll.
To pick it up bring the rolling pin to top of your dough, gently lift the end of the dough on top of the rolling pin and gently roll the dough onto the rolling pin. Do not use any pressure. Use very light gentle hands. Then place the dough at the end of your pie plate and gently unroll the dough into the pie plate. Adjust the pie crust so it is centered in the pie plate.
Using a knife, trim the edges of the crust even with the edges of the pie plate. Set the pie aside and let’s roll out the top crust. You’ll do everything the same as you did for the bottom crust, except leave it on your work surface until the filling has been added on to the bottom crust.

Adding the top Crust
Follow your recipe for your pie filling and place that on your bottom crust in your pie plate.
To place the top crust, use the rolling pin to pick it up and move it. Hold your rolling pin near the top edge of your crust, but not on your crust. Gently lift the top end of the dough on top of the rolling pin and gently roll the dough onto the rolling pin. Do not use any pressure. Use very light gentle hands. Then place the dough at the bottom end of your pie plate and gently unroll the dough into the pie plate. Adjust the pie crust so it is centered in the pie plate.
With a knife cut the crust the same width as the pie plate. Crimp the top and bottom crust edges together either with your fingers or with a fork.
Use a knife put vent holes in the top crust. I like to put them in a special pattern to help it look a little bit prettier.

Sugaring the Top Crust
If I am making a fruit pie and there is cinnamon in it, I will top it with cinnamon and sugar mixture. If the pie has no cinnamon in it, I will put just sugar on the top. I use the same technic.
Lightly rub water on the top of the pie crust and sprinkle the sugar on top. Wet your fingers and rub on the top of the pie. I’ll do this a couple of times until the entire top crust is slightly damp. Then I put on the sugar. This helps the sugar to stick to the pie crust.


Baking the Pie
You will need to cover the crimped pie crust edges with either a pie crust shield or with aluminum foil. You can tear the foil off into three short pieces that are 1-2 inch long. Use them to cover the crimped edges of the crust. This will protect them from over browning or burning. However, you do not want to cover the top crust. It will prevent it from turning that beautiful golden brown.
From there I put the pie plate on a pie drip catcher. It allows for air flow and for the bottom of the pie to cook completely, yet it will catch any pie juice that cooks over. You can either put foil on your oven rack to catch the drippings or use a regular baking sheet.
Bake the pie according to the directions just remove the foil or the pie crust shield 10 minutes before the end of the baking time. Remove it from the oven and let it cool.
If you serve it while it’s warm, the filling may be slightly running, but it will thicken as it cools.


Serving
A slice of homemade with ice cream or whipped topping is perfection in its simplest form. If you are going for a pretty presentation, you can drizzle caramel syrup or pureed fruits on your serving plate, add a slice of pie, and the ice cream or whipped topping. Maybe top it with more caramel sauce or fruit and a sprinkling of chopped nuts.
Try using these homemade pie tips to make your next, or first, homemade pie for you next celebration. If you have any questions, please reach out to me. I will gladly help.
Happy baking!

Pie Crust
Equipment
- 1 Deep Dish Pie Plate
- 1 Large Bowl
- 1 Rolling Pin
- 1 Knife or Scissors
- 1 Pie shield or Aluminum Foil
- Pastry Cutter, Fork, or Food Processor
- 1 Baking Sheet or pie drip catcher
Ingredients
- 2 cup All-purpose flour
- 1 cup Lard or shortening
- ½ cup Water
- ¼ tsp Salt
Instructions
- In a large bowl or in the food processor put in 2 cups of flour and the lard/shortening.
- In a small bowl, dissolve the salt in the hot water. Add to the flour and lard/shortening.
- You can either use a pastry cutter, fork or a food processor to mix the pie crust ingredients until fully mixed together. The dough will be sticky.
- Using your hands divide the dough into 2 doughballs. Place in the refrigerator to chill for about 2 hours or overnight.
- To roll out the dough, flour the work surface, flour the rolling pin, and your hands. Put some flour on the dough ball and flatten it with your hands and begin rolling. Continue to flour your surface, the rolling pin, and the dough to prevent sticking. Roll out the dough until it is large enough to fit your pie plate with about a half inch or more hanging over the pie plate edge.
- To lift your pie crust to place it in your pie plate, gently roll it onto your rolling pin, move it over the pie plate, center it, and unroll the pie crust from the rolling pin placing it where it needs to be in the pie plate as you unroll it.
- Roll out the top crust, but do not lift it yet. Let it stay on your work surface until the filling has been put on the bottom crust.
- To lift your top pie crust, gently roll it onto your rolling pin, move it over the pie filling centering it, and unroll the piecrust from the rolling pin placing it over the filling as you unroll it.
- Cut the edges of the pie crust to be as wide as the edge of the pie plate. The crust should not be wider than your pie plate. Using your fingers or a fork, crimp the edges of the pie crust together pinching them to prevent them from separating and shrinking during baking.
- Cut vent holes in the top crust.
- Using your fingers lightly brush the top crust with water. The crust should be lightly damp. The water is to make the sugar hold. Then sprinkle with sugar.
- Using aluminum foil or a pie crust shield, cover the crust edges. If using foil tear foil into three pieces that are 1-2 inched long. Fold it lightly over the crimped crust. This prevents the crust edges from burning but allows the top crust to get a beautiful golden brown during baking.
- Place a sheet of foil in the oven or put your pie plate on a baking sheet. This prevents the pie from cooking over into the oven.
- Bake according to your recipe. Remove the foil or pie shield from the crust about 10 minutes before the end of your baking time.


